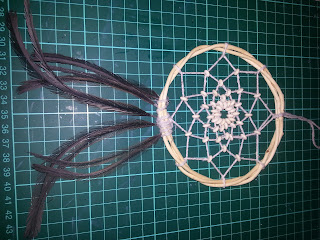
Todays project will teach you how to make a beautiful dream catcher similar to the one pictured below.
What makes this dream catcher unique is it is made entirely of natural materials.

For this project you will need


-A willow ring. You can either buy one from a craft store or make it yourself from fresh weeping willow branches.
-Natural cotton string (try looking for this in the cooking section of your local supermarket)
-Wooden beads. They need to have a hole large enough to fit at least three layers of your thread.
-Feathers. I have chosen natural emu feathers.

Start by cutting a length of the string. The exact size will depend on the size of your wreath. I used about two metres.
On one end tie a loop, leaving a tail on the short side of at least a couple of inches

Add the wreath at the join of the two strings (just under the knot) and tie in place. Trim the short end.

Thread on one wooden bead, then loop the thread approximately 1/8th of the way around the wreath (or 1/16th for a larger piece)

Continue to do this seven more times, until you get all the way back to the start.

From here, thread the cotton through the first bead you strung.

Add another bead, then thread through the second bead you strung.

Keep going around until you have completed another round. Make sure the beads from the outermost layer are spaced evenly before continuing.

Repeat until you cannot add any more beads

Thread the cotton back through the middle row of beads several times to lock it in place, then trim off the end

Your dream catcher is almost complete, now we just need to add some decoration.

Cut a length of the cotton approximately 30cm long. Tie the feathers you want to hang from the bottom at even distances.

Place this string along the bottom back of your wreath, and use the ends to loop back between each feather and around the wreath to hold them in place. Loop the ends around the bottom point and tie off.

Hang from the loop at the top.
And you are done :)
Very nice. Thaks for the idea.
ReplyDeleteBest regards from Spain.
Gostei. Parabéns!
ReplyDelete